Components
A component gives an entity one ability. An entity with a camera component renders the scene, one with a light component lights it, and one with rigidbody and collision components falls, bounces and collides. Components hold the settings of their ability as properties, and an entity can have at most one component of each type.
Built-in Components
Each name links to the component's reference on that surface. The engine name is the one you pass to addComponent(), and also the property that holds the component on its entity: entity.camera, entity.rigidbody and so on.
| Engine | Editor | React | Web Components | What it does |
|---|---|---|---|---|
anim | Anim | <Anim> | <pc-anim> | Plays animations, blended by an anim state graph |
animation | Animation | - | - | Legacy: plays animation clips. Use Anim |
audiolistener | Audio Listener | - | <pc-audio-listener> | The point that sounds are heard from |
button | Button | - | <pc-button> | Makes a UI element respond to hovers and clicks |
camera | Camera | <Camera> | <pc-camera> | Renders the scene from the entity's point of view |
collision | Collision | <Collision> | <pc-collision> | Gives a rigid body or trigger volume its shape |
element | Element | <Element> | <pc-element> | A rectangle of user interface: an image, text or group |
gsplat | GSplat | <GSplat> | <pc-gsplat> | Renders a 3D Gaussian splat |
joint | Joint | - | <pc-joint> | Alpha: connects rigid bodies with a joint |
layoutchild | Layout Child | - | <pc-layout-child> | Overrides how a layout group sizes its element |
layoutgroup | Layout Group | - | <pc-layout-group> | Arranges child UI elements in rows, columns or grids |
light | Light | <Light> | <pc-light> | A directional, omni or spot light |
model | Model | - | - | Legacy: renders a model asset. Use Render |
particlesystem | Particle System | - | <pc-particle-system> | Emits and draws particles |
render | Render | <Render> | <pc-render> | Draws a primitive shape, or the meshes of a render asset |
rigidbody | Rigid Body | <RigidBody> | <pc-rigid-body> | Hands the entity to the physics simulation |
screen | Screen | <Screen> | <pc-screen> | The root of a user interface |
script | Script | <Script> | <pc-script> | Runs your scripts on the entity |
scrollbar | Scrollbar | - | <pc-scrollbar> | A scrollbar for a scroll view |
scrollview | Scroll View | - | <pc-scroll-view> | A scrollable area of user interface |
sound | Sound | - | <pc-sound> | Plays sounds, optionally positioned in 3D |
sprite | Sprite | <Sprite> | <pc-sprite> | Draws a 2D sprite or sprite animation |
React and Web Components wrap the components that most applications use. A dash means there is no wrapper, but you can still add the component to the engine entity from code, as described below.
Adding a Component
You add a component to an entity with the settings it should start with. Any setting you leave out takes its default value.
- Engine
- Editor
- React
- Web Components
const lamp = new pc.Entity('lamp');
lamp.addComponent('light', {
    type: 'omni',
    color: new pc.Color(1, 0.8, 0.6),
    range: 10
});
app.root.addChild(lamp);
addComponent() returns the new component, which is also available as lamp.light. It returns null, and logs a warning in the debug engine, if the entity already has a light. It also returns null if the application has not registered the light component system; see Component Systems.
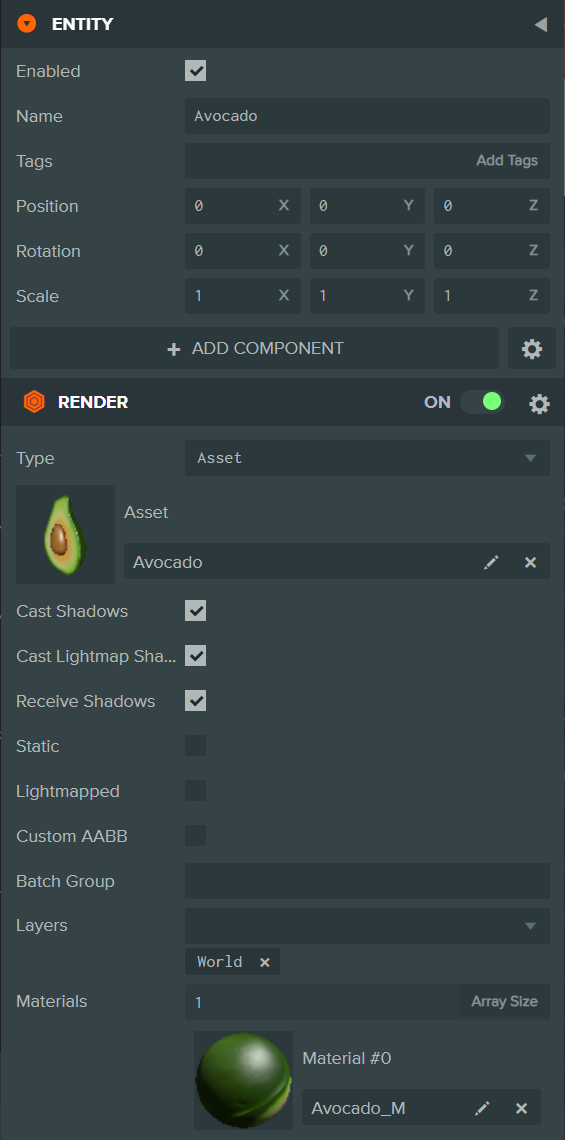
Select the entity and click Add Component in the Inspector, or right-click the entity in the Hierarchy and choose Add Component. The menu groups the components by what they do, and grays out the ones the entity already has. The new component appears as a panel in the Inspector, showing its properties at their default values.
Place the component inside the <Entity>, with its settings as props:
import { Entity } from '@playcanvas/react';
import { Light } from '@playcanvas/react/components';

<Entity name="lamp">
  <Light type="omni" color="#ffcc99" range={10} />
</Entity>
Place the component's tag inside the <pc-entity>, with its settings as attributes:
<pc-entity name="lamp">
    <pc-light type="omni" color="#ffcc99" range="10"></pc-light>
</pc-entity>
A component tag that you append to a <pc-entity> at runtime adds its component straight away.
Components Without a Wrapper
In React and Web Components, you can add a component that has no wrapper to the engine entity, from code.
- React
- Web Components
Write a component that adds the engine component to the entity it is placed in, and removes it when it unmounts. useParent() returns the engine entity of the enclosing <Entity>:
import { useEffect } from 'react';
import { Entity } from '@playcanvas/react';
import { useParent } from '@playcanvas/react/hooks';

function AudioListener() {
  const entity = useParent();

  useEffect(() => {
    entity.addComponent('audiolistener');
    return () => {
      // unmounting the whole entity has already destroyed its components
      if (entity.audiolistener) entity.removeComponent('audiolistener');
    };
  }, [entity]);

  return null;
}

<Entity name="camera">
  <AudioListener />
</Entity>
Wait for the entity to be ready, then add the component to it:
<pc-entity name="logo"></pc-entity>

<script type="module">
    import { whenReady } from '@playcanvas/web-components';

    const logo = await whenReady('pc-entity[name="logo"]');
    logo.entity.addComponent('sprite', { type: 'simple' });
</script>
Reading and Changing Properties
A component's settings are properties that you can read and change at any time, and the component reacts straight away. To change a vector or color property, assign a new value to it.
- Engine
- Editor
- React
- Web Components
lamp.light.intensity = 2;
lamp.light.color = new pc.Color(1, 0, 0);

console.log(lamp.light.range); // 10
Edit the fields in the component's panel in the Inspector. While the scene is launched, your changes are sent to the running application, so you can tune values as you watch. Right-click a field to copy its value and paste it into a field of the same type.
To change a property at runtime, set it from a script, for example this.entity.light.intensity = 2.
Change the prop. The component's property is updated when the component renders:
function Lamp({ on }) {
  return (
    <Entity name="lamp">
      <Light type="omni" intensity={on ? 2 : 0} />
    </Entity>
  );
}
Change the attribute:
const light = document.querySelector('pc-entity[name="lamp"] > pc-light');
light.setAttribute('intensity', '2');
Once the element is ready, its component property is the engine component, for the properties that have no attribute.
Disabling and Removing a Component
Every component has an enabled property. A disabled component stops working, so a disabled render component is not drawn and a disabled script component stops running its scripts, but it keeps its settings until you enable it again. Removing a component deletes it and its settings. Disabling the whole entity disables all of its components at once; see Enabling and Disabling.
- Engine
- Editor
- React
- Web Components
box.render.enabled = false; // stop drawing the box
box.render.enabled = true;  // draw it again

box.removeComponent('render');
Turn a component off and on with the switch in its panel's header. The cog in the header opens a menu to Copy Component, Paste Component onto another entity, and Remove Component.
Stop rendering a component to remove it. The components have no enabled prop, so to disable one and keep its settings, set enabled on the engine component, through a ref to its entity:
import { useEffect, useRef } from 'react';
import { Entity } from '@playcanvas/react';
import { Light, Render } from '@playcanvas/react/components';

function Box({ visible, lit }) {
  const ref = useRef(null);

  useEffect(() => {
    ref.current.render.enabled = visible;
  }, [visible]);

  return (
    <Entity ref={ref} name="box">
      <Render type="box" />
      {lit && <Light type="omni" />}
    </Entity>
  );
}
Set the enabled attribute of the tag to disable the component, and remove the tag to remove it:
<pc-entity name="box">
    <pc-render type="box" enabled="false"></pc-render>
</pc-entity>
Adding Your Own Behavior
The built-in components cover the abilities the engine provides. For everything else, from a door that opens to the rules of your game, write a script and attach it to an entity with a script component. A script component can run any number of scripts, and each one reaches its entity as this.entity. Here is a script that spins its entity around its vertical axis:
import { Script } from 'playcanvas';

export class Spin extends Script {
    static scriptName = 'spin';

    /**
     * How fast to spin, in degrees per second.
     *
     * @attribute
     */
    speed = 90;

    update(dt) {
        this.entity.rotate(0, this.speed * dt, 0);
    }
}
- Engine
- Editor
- React
- Web Components
box.addComponent('script');
box.script.create(Spin, { properties: { speed: 45 } });
Save the script as an asset, such as spin.mjs, add a Script component to the entity and choose spin from its Add Script list. The Inspector then shows a field for the speed attribute. See Managing Scripts.
Props other than script are assigned to the script instance:
import { Script } from '@playcanvas/react/components';

<Entity name="box">
  <Render type="box" />
  <Script script={Spin} speed={45} />
</Entity>
Register the script with the application under its name, then add it with a <pc-script-instance> inside a <pc-script>:
<pc-entity name="box">
    <pc-render type="box"></pc-render>
    <pc-script>
        <pc-script-instance name="spin" attributes='{"speed": 45}'></pc-script-instance>
    </pc-script>
</pc-entity>

<script type="module">
    import { registerScript } from 'playcanvas';
    import { whenReady } from '@playcanvas/web-components';
    import { Spin } from './spin.mjs';

    await whenReady('pc-app');
    registerScript(Spin, 'spin');
</script>
Component Systems
For each type of component, the application has one component system, which creates every component of that type, updates them each frame and destroys them. Systems live in app.systems, under the same names as the components, and some of them hold settings that all of their components share:
// the gravity that pulls on every rigid body
app.systems.rigidbody.gravity = new pc.Vec3(0, -1.62, 0);
An application can only add components whose system it has registered. pc.Application registers every built-in system, as do the Editor, React and Web Components. pc.AppBase registers only the systems you list, so that a bundler can leave the others out of your build:
const options = new pc.AppOptions();
options.graphicsDevice = device;
options.componentSystems = [
    pc.RenderComponentSystem,
    pc.CameraComponentSystem,
    pc.LightComponentSystem,
    pc.ScriptComponentSystem
];

const app = new pc.AppBase(canvas);
app.init(options);
See Using the Engine Standalone for the rest of the setup.
See Also
- Entities - Creating, enabling, destroying and copying the entities that components live on
- Scripting - Writing scripts, their lifecycle and their attributes
- Inspector Panel - Editing components in the Editor
- PlayCanvas React and Web Components - The React components and the Web Components tags
- Component and ComponentSystem - The engine API reference